
That piercing, high-pitched shriek from a smoke detector – it’s a sound that can instantly shatter your peace, day or night. While its main job is critical (alerting you to fire dangers), sometimes that alarm just… goes off. Burnt toast, shower steam, a cloud of dust, maybe even a tiny spider exploring the sensor – these can all trigger frustrating nuisance alarms. Or perhaps you just put in a fresh battery, but the detector insists on delivering that annoying chirp… chirp… chirp.
When this happens, knowing exactly how to reset smoke detector alarm systems isn’t just about getting silence back; it’s vital for ensuring your detector is working correctly and ready for a real emergency. Let’s face it, a detector that cries wolf too often might tempt someone to disable it, and that’s a dangerous path. According to the experts at the National Fire Protection Association (NFPA), working smoke alarms slash the risk of dying in a home fire by over 50%. So, let’s fix the annoyance, not ditch the protection.
Here’s the deal: This guide is your one-stop resource for understanding and performing a smoke alarm reset. We’ll cover:
- Why resets are even necessary.
- Step-by-step instructions for both battery-powered and hardwired units (resetting smoke alarm types explained!).
- Troubleshooting tips for when the beeping or false alarms just won’t quit (stop smoke alarm beeping strategies).
- Simple maintenance to keep things running smoothly.
Our goal? To give you the confidence to handle these situations safely, effectively, and make sure your smoke alarms are always on guard.
Why Does a Smoke Detector Need Resetting Anyway?
Okay, before we jump into the how, let’s quickly cover the why. Resetting isn’t just flipping a switch; it serves specific purposes in keeping your detector functional. Understanding this helps you know when learning how to reset smoke detector alarm devices is the right move.
Here are the common scenarios:
- Silencing False Alarms: This is number one. Cooking smoke (that accidental burnt offering!), steam from a long, hot shower, dust bunnies stirred up during cleaning, or even curious insects can fool the sensor. A reset clears the alarm state once the trigger is gone.
- After a Real (Minor) Event: If you had a small, quickly handled fire (like a grease flare-up on the stove), you’ll need to reset the alarm after the smoke is totally clear and you’re sure the danger has passed.
- Post-Battery Change Glitches: Sometimes, even a brand-new battery doesn’t stop the chirping immediately. Performing a reset helps the unit properly recognize the new power source and clear any old low-battery signals or error codes. If this is your specific headache, you might find more tailored tips at Smoke Detector Beeping After Battery Change.
- Troubleshooting Chirps & Malfunctions: That maddening chirp every minute? Often low battery, but it could also mean dust, a fault, or the unit telling you it’s retirement time. Resetting is your first diagnostic step to see if the issue clears. Understanding how to reset smoke detector alarm procedures is crucial for this chirping fix.
- Clearing ‘Ghost’ Power (Residual Charge): Think of it like static cling. Sometimes, even with no battery or power, a tiny electrical charge stays in the detector’s circuits. This can cause weird behavior. The reset process (especially holding the test button while powerless) fully drains this charge, giving the unit a clean slate.
- Resetting Interconnected Systems: Got hardwired alarms that all go off together? If one unit triggers falsely, you might need to reset that specific one (or sometimes the whole system via the breaker) to silence all of them.
Knowing how to reset smoke detector alarm methods isn’t just about noise control; it’s about restoring your detector to its watchful state, ready for its real job.
Safety First! Before You Touch That Detector…
STOP. READ THIS FIRST. Your absolute top priority is safety. Never assume an alarm is false.
- ASSESS! Before you even think about how to reset smoke detector alarm, immediately check for actual fire or smoke. Look around. Smell the air. Listen carefully.
- FIRE? EVACUATE! If you see flames, smell thick smoke, or have any doubt – GET OUT NOW. Forget the reset. Follow your fire escape plan, get everyone outside, stay out, and call 911 from a safe distance. Property is replaceable; lives are not.
- NO FIRE? INVESTIGATE (Safely): Okay, you’re certain there’s no immediate danger. Now try to see which detector is sounding off. What might have caused it? Burnt dinner? Steam rolling out of the bathroom? Kicked up dust during cleaning?
- AIR IT OUT: If it’s clearly cooking smoke or steam, open windows and doors wide. Use a fan (wave a towel, don’t aim a fan directly at the detector at first) to disperse the air around the unit. Often, this alone will silence the alarm.
- LOOK FOR THE HUSH BUTTON: Many modern detectors have a “Hush” or “Silence” button. Pressing this first can temporarily silence the alarm for 5-15 minutes, giving you time to clear the air without needing a full reset. Check your detector’s face!
- GET A LADDER: You’ll need to reach the detector. Use a sturdy stepladder. Never stand on wobbly chairs, tables, or anything unstable. If you can’t reach it safely, don’t risk it – especially if dealing with hardwired units and breakers.
Only after you’ve confirmed there’s no fire, tried airing out the room, and maybe used the hush button, should you proceed with the manual reset steps below. Safe resetting smoke alarm practices are non-negotiable.
The “Magic Trick”: Draining Residual Charge for a Clean Reset
Think of this as the universal technique, the core principle behind most smoke detector resets. It works because it addresses a common issue: lingering electrical charge messing things up. Mastering this is key to truly understanding how to reset smoke detector alarm devices effectively.
Here’s the basic sequence – remember this:
- CUT ALL POWER: Absolutely essential.
- Battery Units: Pop that battery right out.
- Hardwired Units: Switch off the correct circuit breaker and remove the backup battery. (We’ll cover finding the breaker soon).
- PRESS & HOLD: Find the Test/Reset button. With the power completely off, press and hold this button down for 15-30 seconds. You’re essentially forcing the internal circuits to drain completely.
- WAIT A BEAT: After releasing the button, give it another 15-30 seconds with no power.
- POWER BACK UP:
- Battery Units: Insert a brand new, correct-type battery. Check the +/- orientation carefully!
- Hardwired Units: Put the backup battery back in, reconnect the wiring plug, snap the detector back onto its base, then flip the circuit breaker back on.
- TEST IT: Press the test button. It should sound off loudly. If interconnected, all alarms should sound. This confirms it’s working again.
This “Power Down -> Hold Button -> Power Up” sequence is your go-to method for how to reset smoke detector alarm units and clear many common glitches. Now, let’s get specific for battery and hardwired models.
How to Reset Battery-Powered Smoke Detectors (Step-by-Step)
These are usually the simpler ones. If your detector runs only on batteries, here’s your detailed guide for a battery smoke alarm reset:
- Get Up There Safely: Stable ladder – check!
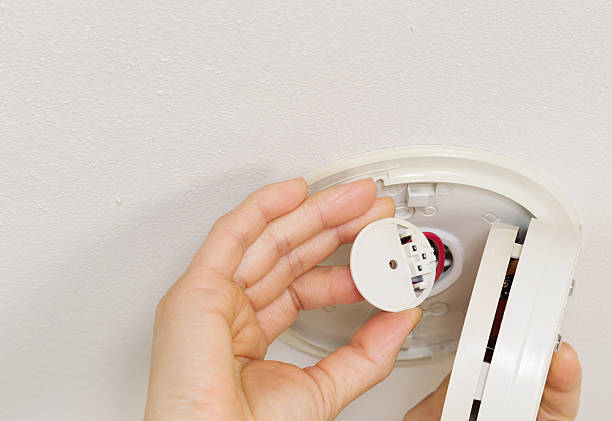
- Access the Battery: Either slide open the battery door or twist the whole detector counter-clockwise off its base. If you’re unsure, glance at the manual (if you have it).
- Battery Out: Remove the battery completely. Don’t put the new one in just yet if you’re doing the full reset.
- The Reset Hold: Find that Test/Reset button. Press and hold it down firmly for a good 15-30 seconds. This drains that pesky residual charge.
- Clean It While You’re There (Highly Recommended!): Dust is the enemy of smoke detectors! While it’s down and powerless:
- Use a vacuum cleaner with the soft brush attachment around the vents/slots.
- Alternatively, use canned compressed air (hold upright, short bursts, few inches away).
- Wipe the outside casing with a microfiber cloth.
- Why bother? Because cleaning is often the real solution, especially for nuisance alarms. Combining cleaning with knowing how to reset smoke detector alarm techniques is powerful. If dust seems like a constant battle, maybe check your home’s airflow or filtration.
- Fresh Battery In: Get rid of the old battery properly. Insert a brand new battery – make sure it’s the type recommended by the manufacturer (check the label!). Double, triple-check the + and – alignment. Seriously, it’s easy to get wrong.
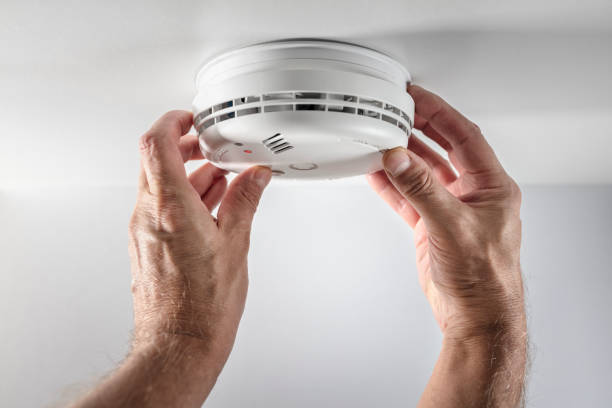
- Close Up / Remount: Snap the battery door shut or twist the detector clockwise back onto its base until it clicks firmly. Most won’t attach properly without a battery correctly installed.
- Test, Test, Test: Press and hold the test button. Hear that loud BEEP? Good! It means the reset likely worked and the new battery is good to go. If no sound, re-check battery installation, try another new battery (yes, even new ones can be duds), and check the expiry date on the detector itself (more on that later).
- Listen: Keep an ear out for any more weird chirps or alarms. If all is quiet, you’ve successfully learned how to reset smoke detector alarm for battery units!
How to Reset Hardwired Smoke Detectors (Step-by-Step with CAUTION!)
Hardwired detectors are যুক্ত (connected) to your home’s electrical system, usually with a battery backup. Resetting involves handling household power. Safety Warning: If you are not comfortable or knowledgeable about your home’s circuit breaker panel or handling electrical wires, STOP HERE and call a qualified electrician. Risking electrical shock is never worth it.
For those comfortable proceeding, here’s how to reset smoke detector alarm systems that are hardwired:
Step 1: Locate and Turn Off the Correct Circuit Breaker
- Find Your Panel: Go to your main electrical panel (breaker box).
- Identify the Breaker: Look for labels like “Smoke Detectors,” “Fire Alarm,” or circuits powering common areas like “Hall Lights,” “Bedrooms.” It might be on a shared circuit.
- Testing (If Unsure): If not clearly labeled, you might need to switch likely breakers off one by one and check the indicator light (usually green or red) on the smoke detector. When the light goes out, you’ve found it.
- LABEL IT! Once found, clearly label that breaker for the future! This saves headaches later.
- Switch OFF: Flip the identified breaker firmly to the “OFF” position. Double-check the detector’s light is off to confirm power is cut.
Step 2: Perform the Reset at the Detector Unit(s)
- Safe Access: Use that sturdy ladder again. You might need to reset the specific unit that triggered the alarm, or it might be best to reset all units on the circuit.
- Remove Detector: Twist the unit counter-clockwise off its mounting bracket. It will hang by a short wire connector.
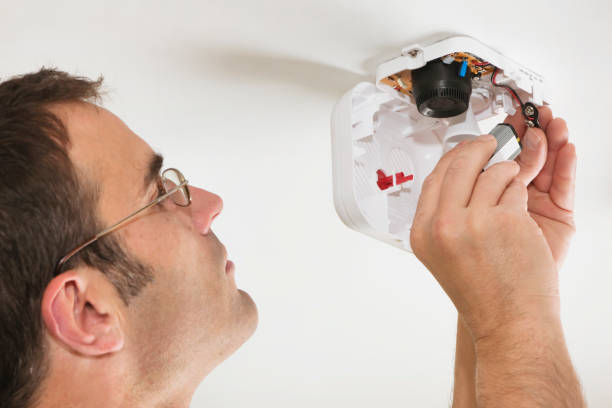
- Disconnect Wiring: Look for a small plastic plug connecting the detector to the ceiling wires. There’s usually a little clip to squeeze or lift. Gently unplug this connector. Never yank the wires.
- Remove Backup Battery: Find and take out the backup battery. This is vital for the reset.
- The Reset Hold: Just like battery units, press and hold the Test/Reset button on the detector for 15-30 seconds. Repeat for any other detectors you’ve taken down on this circuit.
- Clean It Now: Perfect time to vacuum or use compressed air on the vents, especially if dust might be the issue.
- Re-insert Backup Battery: Put in a fresh backup battery (recommended!) or the old one if it’s definitely still good. Check polarity!
- Reconnect Wiring: Plug the wire harness back into the detector securely. Listen for a click.
- Remount Detector: Align it with the base and twist clockwise until it locks firmly. Repeat for all units.
- Turn Breaker ON: Go back to the panel and switch the breaker firmly back to “ON.”
Step 3: Verify and Test
- Observe Lights: Detectors should power up. You might see flashing lights or hear a chirp. Wait a minute for them to stabilize. A steady or periodically flashing green light usually means normal AC power operation. Check your manual for specifics.
- TEST THE SYSTEM: This is critical for interconnected units! Press and hold the test button on one detector. That unit and all others connected to it should sound the alarm. Go around and test each detector individually to ensure they all trigger the whole system. This confirms your hardwired smoke detector reset was successful and the interconnection works.
Remember, safety is paramount when dealing with household electricity. If in doubt, call a pro!
Resetting Different Smoke Detector Types (Ionization, Photoelectric, Combo)
Does the type of detector change how you reset it? Mostly no, but there are nuances. The main sensor types are:
- Ionization: Better at sensing fast, flaming fires. The standard reset (power down, hold button) works fine. Some guides mention 15-20 seconds hold time.
- Photoelectric: Better at sensing slow, smoldering fires (and less prone to cooking nuisance alarms). Reset is similar, but cleaning the sensor chamber with compressed air is often extra important for these optical sensors. Hold time around 20 seconds is typical.
- Combination: Includes both sensor types, maybe Carbon Monoxide (CO) too. Reset follows the general rule: cut all power (AC + battery), hold button. Check the manual, especially if a CO event was involved, as there might be specific steps. Need to know more about detector types? Check out Types of Smoke Detectors Explained.
The Big Takeaway: While tech varies, the core method how to reset smoke detector alarm units remains consistent: Power Off -> Hold Button -> Clean (if needed) -> Power On -> Test.
Pro Tip: Always try to find the manual for your specific model online! Manufacturers like Kidde and First Alert have great support sections. Knowing your model helps immensely.
Troubleshooting: Ugh, Why Won’t It Stop Beeping/Alarming?!
Okay, you did the reset. You held the button. You even cleaned it. But that #&@! chirp or false alarm is back. Don’t throw it out the window just yet! Let’s troubleshoot. Knowing how to reset smoke detector alarm is step one; diagnosis is step two.
Problem 1: Persistent Chirping (The Annoying Beep… Beep Every Minute)
This usually signals a problem the detector wants you to notice.
- #### Battery Issues (Still!):
- Really New?: Try another brand-new battery from a different pack.
- Right Type?: Using alkaline when it needs lithium? Double-check the requirement.
- In Correctly?: 100% sure the + and – are aligned? Easy mistake.
- Drawer Shut?: Is the battery compartment fully closed and latched?
- Reset Fully?: Did you really hold the button long enough with the battery out? Try the full reset again. See First Alert’s tips for chirps with new batteries .
- #### Dust: The Hidden Culprit:
- Even after cleaning, stubborn dust might linger deep inside. Give it another go with the vacuum brush AND compressed air. Be thorough around all vents.
- #### End of Life Signal (Very Common!):
- Check the Date! Most detectors last 10 years. Find the manufacturing or expiry date sticker (usually on the back/side). If it’s over 10 years old (or 7 for some very old models), it needs replacement. No reset will fix this. It’s designed to chirp to tell you it’s unreliable.
- #### Environmental Factors:
- Temperature Swings: Is it near a drafty window, unheated attic, or poorly insulated garage? Extreme cold (<40°F/4°C) or heat (>100°F/38°C) can cause issues.
- Humidity: Near a steamy bathroom or damp basement? High humidity can sometimes cause chirps. Improve ventilation if possible.
- Airflow: Directly under an AC vent or ceiling fan blowing right at it? This can sometimes cause issues.
- #### Hardwired Unit Glitches:
- Brief power flickers can sometimes put hardwired units into a chirp/error state. The full breaker reset should fix this. If it happens often, there might be wiring issues.
- #### “Hush” Feature Hangover:
- Did someone press the silence button earlier? Some models chirp briefly after the hush period ends. This should stop soon or after pressing test/reset again.
- #### Faulty Unit:
- Sometimes, despite everything, the detector itself is just faulty and needs replacing, even if it’s not 10 years old.
Problem 2: Persistent False Alarms (Full, Loud Alarm – No Fire)
This is alarming (pun intended!) and needs addressing quickly.
- #### Identify the Trigger Zone:
- When does it happen? Cooking? Showering? Furnace kicking on? Dusting that specific area? This helps narrow down the cause.
- #### Location, Location, Location:
- Too Close to Kitchen/Bath? NFPA recommends >10 feet (ideally >20 ft) from cooking appliances and >3 feet from bathroom doors where steam escapes. If it’s closer, it’s prone to nuisance alarms.
- Direct Airflow? Is an AC/heating vent blowing right onto it?
- Consider Relocating: Moving it slightly (while still following placement guidelines – check Smoke Detector Placement Guide ) might solve it. Using a photoelectric type alarm near kitchens is often recommended.
- #### Cleaning is Crucial (Again!):
- Dust, grease buildup (especially kitchen-adjacent units), or tiny insects are major culprits. A thorough vacuuming/compressed air cleaning is essential. This might need doing more often in problem areas. Effective resetting smoke alarm procedures often include cleaning.
- #### Humidity & Steam:
- Ensure bathrooms have working exhaust fans used during and after showers.
- #### Power Issues (Hardwired):
- Electrical surges or “dirty power” can sometimes trigger sensitive hardwired alarms. If frequent, consult an electrician.
- #### Interconnected System Faults:
- In a linked system, one faulty detector can set them all off. Try to spot the one with the rapidly flashing LED during the false alarm – that’s likely the initiator. Performing the full hardwired smoke detector reset on that specific unit might fix it. If you can’t tell which one started it, reset the whole system via the breaker.
- #### Old Age / Faulty Unit:
- As detectors age (approaching 10 years), their sensors can become overly sensitive or erratic. If false alarms persist after trying everything else, replacement is the safest bet.
Troubleshooting takes patience. Work through these systematically. The goal is to stop smoke alarm beeping and false alarms reliably. For a deeper dive, explore comprehensive guides on Smoke Detector Beeping Causes.
Preventative Maintenance: Stop Problems Before They Start!
Want fewer headaches? The best how to reset smoke detector alarm strategy is avoiding the need for it! Regular maintenance is simple and keeps your detectors reliable.
✓ Test Monthly: Your First Check
- Push the Button: Once a month, press and hold the test button on every detector until it sounds loudly.
- Check Interconnection: For hardwired systems, testing one should make all of them sound. If not, there’s a connection issue.
- Why? Confirms power, circuitry, and the siren are working. Takes 10 seconds per detector.
✓ Clean Regularly: Banish Dust & Bugs
- Twice a Year (Minimum): Use your vacuum’s soft brush attachment around the vents/slots. Or use compressed air (follow can directions).
- More Often If Needed: If it’s near a kitchen, dusty area, or after renovations, clean more frequently.
- Why? Prevents the #1 cause of false alarms and ensures smoke can actually reach the sensor.
✓ Replace Batteries Annually (Or As Needed – Read Your Detector!)
- Standard Batteries (9V, AA Alkaline): Replace at least once a year. Easy reminder: when you change clocks for daylight saving time. Don’t wait for the chirp! Use the exact type recommended.
- 10-Year Sealed Lithium Batteries: You don’t replace these batteries. The entire unit gets replaced when it starts its end-of-life chirping pattern (usually after about 10 years).
- Why? Ensures reliable power. Low batteries cause chirps and unreliable operation.
✓ Replace the Entire Unit Every 10 Years (Non-Negotiable!)
- Find the Date: Check the manufacture or “Replace By” date on the back/side.
- 10 Year Lifespan: Sensors degrade over time. Replace ALL smoke detectors every 10 years. Write the installation/replacement date on the new unit with a marker.
- Why? Old detectors are unreliable, period. The NFPA mandates 10-year replacement . Knowing how to reset smoke detector alarm won’t fix an expired unit.
✓ Know Your Lights & Manuals
- Indicator LEDs: Glance at the lights occasionally. Steady green usually means AC power is good (hardwired). Flashing lights can indicate normal status or an alarm. Consult your manual!
- Read the Manual: Seriously, keep it handy or find it online. It has specific info for your model on testing, lights, battery type, and reset nuances.
Consistent maintenance is your best defense against nuisance alarms and detector failure.
When You Need Backup: Calling a Professional
While DIY resetting smoke alarm methods and maintenance handle most issues, sometimes you need an expert. Call a qualified electrician if:
- You’re Uncomfortable with Electricity: Working inside a breaker panel or handling wiring for hardwired units is risky if you’re not experienced. Don’t guess – call a pro.
- Problems Persist After Troubleshooting: You’ve reset, cleaned, changed batteries, checked the age… and it still acts up? Could be a faulty unit or deeper wiring issues (for hardwired systems).
- Can’t Find the Right Breaker: If you can’t safely identify the breaker for your hardwired alarms, an electrician can trace it and label your panel.
- Need Help Installing/Replacing: Especially for multiple hardwired units, professional installation ensures safety and correct interconnection. They can also advise on optimal placement.
- Suspect a System-Wide Wiring Fault: If all your hardwired units are acting strangely simultaneously, it points towards a wiring problem needing professional diagnosis.
Your safety is worth the cost of a professional service call when needed.
Conclusion: Keeping Your Home Safe and Sound (Without the Annoying Beeps!)
Smoke detectors are lifesavers, plain and simple. But yes, they can sometimes be a source of frustration. Thankfully, knowing how to reset smoke detector alarm units – whether it’s a quick hush for cooking smoke or a full power-down reset – puts you back in control.
Let’s recap the absolute key takeaways:
- 🚨 Safety First, Always: Assume any alarm is real until proven otherwise. Evacuate if unsure!
- 🔁 The Core Reset: Power Off (Battery/Breaker) -> Press & Hold Test Button (15-30s) -> Power On -> Test.
- 🧹 Cleanliness Counts: Regular vacuuming/compressed air prevents many false alarms.
- 🔋 Fresh Power: Use the right, new batteries. Replace annually (standard) or the unit at 10 years (sealed).
- ⏳ Replace Every 10 Years: Non-negotiable for reliability. Check those dates!
- 📞 Call Pros When Needed: Don’t risk electrical safety or ignore persistent issues.
By understanding these steps for resetting smoke alarm devices and committing to simple maintenance, you minimize nuisance alarms, ensure your detectors are ready for a real emergency, and gain valuable peace of mind.
Why not take 5 minutes right now? Go test your detectors, check their dates, and maybe give them a quick vacuum. Your future self (potentially woken by silence instead of beeping!) will thank you.
Found this guide helpful? Share it with friends and family! Have more questions about smoke detectors? Explore other articles on SmokeDetectorBeeping.com or leave a comment below if the platform supports it.